Kiss Me Cups (Guest Post by Ellie)

Kiss Me Cups by Ellie (Ellie's Bites)

We are now on our fifth day of winter break, with eight days to go. So far, we’ve managed stay busy, but I’m getting a little nervous that we have already crossed so much off of our to-do list! Will we be able to hold off the cabin fever? Will we wind up booking a last minute (and way out of this year’s budget) trip to Disney World? Tempting. We’re taking it a day at a time.

Today was tough. It’s Christmas and we are Jewish. Usually Hanukkah falls around the same time so we have SOMETHING to do on the 25th when everything is closed, but Hanukkah was sooooo early this year that we are really just sitting around the house today. We took a break from movie watching and Magna-tile playing to throw together a little treat. It’s made using left over Christmas kisses, but it would also be perfect for (should I even say it?) Valentines Day (too early, sorry). Anyway. It’s easy to make with the kids if you need a diversion. I’ll pass the computer over to Ellie now!

Kiss Me Cups (Ellie's BItes)

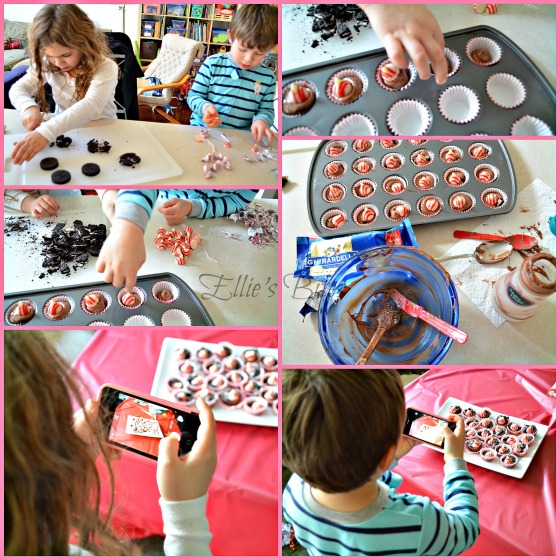
Me,Mom and Ben came up with the name Kiss me cups because every time Mommy was ready for Ben to put on a heresy kiss on it,Mommy said “Kiss me!”The way to make our DELICIOUS kiss me cups you need:1 bag of good quality chocolate chips.(We used Ghirardelli milk chocolate)24 candy cane hershey kisses-unwraped.12 oreos cut into quarters.

Thats all we need.Now this is how you make it:

.Line the cups of a mini cupcake pan with liners.

.Melt the chocolate chips.(Half power for one minute.Then half power for 30 second intervals,stirring between intervals.)

.Scoop a little bit of chocolate into the cups.(or use a squeeze bottle.)

.Press in two quarters of an oreo,press  the cookies into the chocolate.

.Scoop a little more chocolate on top of the cookies.

.Press a hershey kiss on top.

.Chill in the refrigerator  for at least 20 minutes.

.Enjoy:)(After lunch or dinner!)

Kiss Me Cups Collage (Ellie's Bites)

And thats how you make our DELICIOUS kiss me cups.

A LITTLE BIT ABOUT ME AND MY FAMILY AND FRIENDS!

Me and my family and friends went to the christmas light show last night.I liked the guy shooting presents from a cannon into a present bag!They even told us to put on a certain channel on the radio so we could hear Christmas music while we drove through !The snowmen kept waving their hand telling us which way to go!It was a drive through!

Kiss Me Cups Photo by E (Ellie's Bites)

P.S.Merry christmas to who celebrates Christmas!

Simple Holiday Candle Place Card Cookies

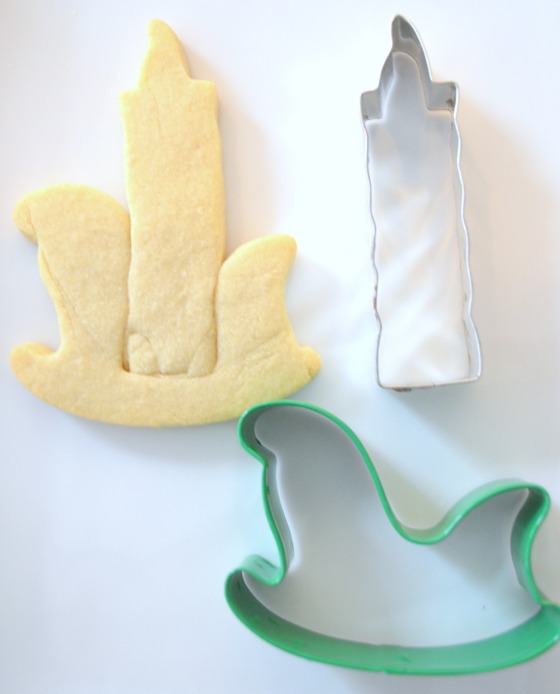
Sometimes you look at a cookie cutter and immediately see something other than what it is supposed to be.Holiday Candle Cookie out of Santa sled and candle (Ellie's Bites)

Like this Santa sled from the Santa/sled/reindeer three pack. To me it looks like an old fashioned candle holder and I thought those would make some cute place card cookies for your Holiday table. So, roll out your dough, and cut out the sleds. Cut out a candle and use the candle cutter to cut a notch from the sled. Place the candle inside and bake the cookies. Let them cool completely on the baking sheet.

You’ll need:

  • Gold icing in piping and flood consistency (This is a mixture of Americolor egg yellow, and Americolor gold)
  • Red icing in piping and flood consistency
  • Green very stiff icing
  • Gold airbrush color, Gold luster dust, and/or Wilton’s Color Mist in gold. (Optional)
  • Yellow Edible Glitter (Optional)

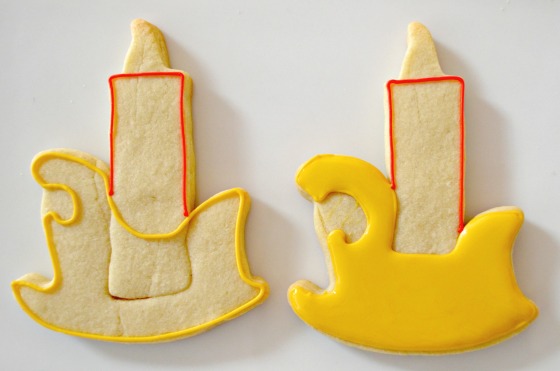
Holiday Candle (Ellie's Bites)

  •  Out line the candle holder in gold and the candle in red. 
  • Flood the candle holder and allow it to dry. Flood the candle and allow the whole thing to dry completely.
  • Holiday Candle Place Card Cookies (Ellie's Bites)When you flood the candle, you can either flood the whole thing, then after it dries, add dripping wax details. Or you can flood it in sections to add dimension.
  • Using the gold piping icing, add a flame, and immediately pour on a little edible glitter to make the flame sparkle.
  • Use gold piping icing to add scrolls and a name (or message).
  • If you want, spray lightly with gold airbrush color, Wilton Color Mist in Gold, or brush with gold luster dust.
  • Use the very stiff green icing and the red piping icing to add a little sprig of holly.

So, it’s getting close to Christmas! Five more days! What’s on your wish list? Are you baking anything I should know about?

What Does Santa Say?

What Does Santa Say (Ellie's Bites)

Oh, to see my three year old dance to “What Does The Fox Say“.  I don’t think I have EVER been that into a song- even on my most Amstel Light, Jersey shore bar, cover band filled night!

Ever since Shannon at Artfully Delicious shared her “What Does The Fox Say” cookies, I have been wanting to make a version of my own.  I thought this was a really fun holiday twist on the whole phenomenon.

They were really easy to make!

You’ll need

  • A cookie base coated in white and dried completely.
  • A Hohoho stencil (A friend made mine for me because I needed it at the last minute but you can buy one here from Salsa Stencils/ Salsa Sweets on Facebook)
  • Airbrush color in green or Wilton’s Color Mist in green
  • Dark Orange icing in a one step/ 20 second consistency (I mixed a little bit of Americolor red with a little more Americolor lemon yellow and a drop of Americolor egg yellow)
  • Sugar Pearls in White and Black
  • Red one step/ 20 second consistency icing
  • White piping icing
  • A fine tipped black food color marker

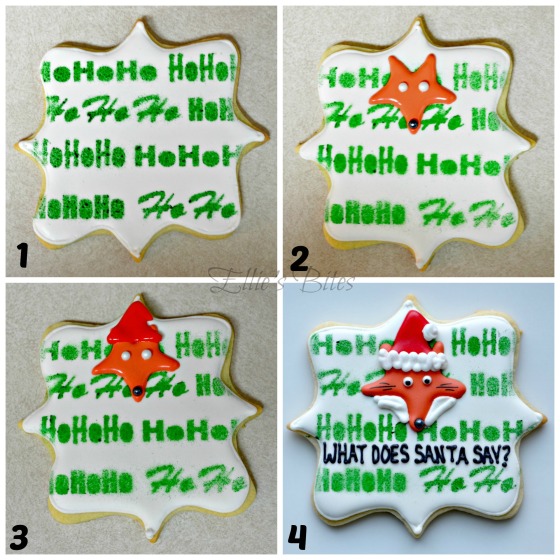
What Does Santa Say Collage (Ellie's Bites)

  1.  Lay your stencil over your cookie and lightly spray with green mist. (I know I need a bit of practice with my new airbrush!) Let the color dry for several minutes.
  2. Using the dark orange icing, pipe- and immediately fill in- a star shape with a point facing strait down. While it’s still wet, drop in two white sugar beads for eyes, and a black sugar bead for a nose. Let this dry for at least a half hour.
  3. Using the red icing, pipe -and immediately fill in- a hat shape over the fox face. Let the whole thing dry now for several hours.
  4. Use the white piping icing to fill in the white parts of the fox face and add a cuff and pompom to the hat. Use the food color marker to add pupils to the eyes, and whiskers. With black piping icing, add the writing. You can use a kopykake or just eyeball it like I do.

To get the writing on evenly with out a kopykake, I usually count the number of letters and start in the middle of the cookie. Here, I started in the center and wrote “SANTA SAY?” then went back and filled in “SEOD TAHW” or “WHAT DOES” backwards starting again, from the center.

The fox was inspired by this cookie by The Bearfoot Baker.

I hope you get a chance to make these, but if not this year- grab a stencil now and make them next year! Maybe the song will still be around then. Or maybe it’s already had it’s run. I can never really keep up with these things and that is exactly why I am going to embarrass the crap out of my kids someday 😉


Easy Grinch Cookies

*****Update- yes, I know it is unusual to update a post before it’s published. Technically it’s called “Editing”, right? I just want to make a quick note. It’s funny sometimes, this cookie world! We all joke that there are so few ideas out there and we are so super proud of ourselves when we think we’ve found one. I was looking at something, and I can’t even remember what, but there was a picture of the Grinch. And when I looked at him, I thought, “Hey! That ornament cutter that I just bought and used to make these is a spot on Grinch!” and I was so excited. I NEVER google ideas when I have them, because I simply don’t want to know that it’s been done. That way, I know that even if what I make is the same as something else, it’s going to be a little bit different. But this time, I actually Googled “Grinch cookies” and “Grinch cookie from ornament cutter” and found nothing. So, this past Saturday, I cut a few ornaments when I was making Gingerbread men for the kids to decorate. And I made my Grinches. Sunday, I took pictures, wrote this post, and scheduled it to publish today. Then I opened Facebook and the first thing I saw was THESE amazing Grinches by Sugarbelle! Really, lol? If someone had to do the same thing at the same time, it had to be someone who would do it PERFECTLY!! I may have cried for a minute. But in the end, and after a long chat with Callye (who, as it turns out happens to be the most encouraging person on the face of the earth), I  moved on. I’d love to chalk it up to great minds thinking alike, but I know it’s only that admiring Callye’s work for so long has given me the ability to see different things in ordinary cutters. So thank you for the lessons in “Cookie Think”!!!! I decided to publish the post as I wrote it on Sunday, so I’m sorry if I pat my self on the back a few too many times! Absurdly long update over- carry on*****

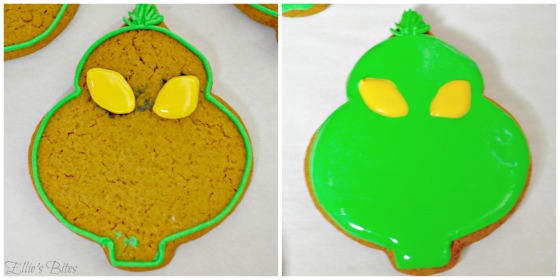
That Wilton ornament cutter I picked up at Walmart is turning out to be almost as versatile as the skull cutter! These Grinch cookies are so easy to make and would be a really fun addition to a platter of assorted ornament or candy shaped cookies.

Easy Grinch Cookies (Ellie's Bites)

All you will need is:

  • Green piping and flood icing (This is Americolor leaf green)
  • Yellow one step (20 second) consistency icing (this is a mixture of Americolor gold and egg yellow, but any yellow you have made already will do)
  • Black piping icing

Cut and bake your ornament cookies. Let them cool completely and turn them upside down so the point is on the top.

Easy Grinch Cookies Collage (Ellie's Bites)

  • Outline the Grinch’s head with the green piping icing and a PME 1.5, Ateco 1, or Wilton 2 tip. Add his tufts of hair.
  • Outline and immediately fill the eyes. (I tried it in black first and didn’t like it as much so I scraped away the black and used the yellow). Drag a toothpick through the yellow to pop bubbles and prevent craters. You can also define the shape a bit by dragging the icing out at the points with the toothpick.
  • Let the yellow dry completely then flood the green face. Let this dry for several hours.
  • Add the details in black piping icing with a PME 1.5 or Wilton #1 tip. Add a nose with green piping icing and let the whole guy dry completely before packaging or eating.

Enjoy!

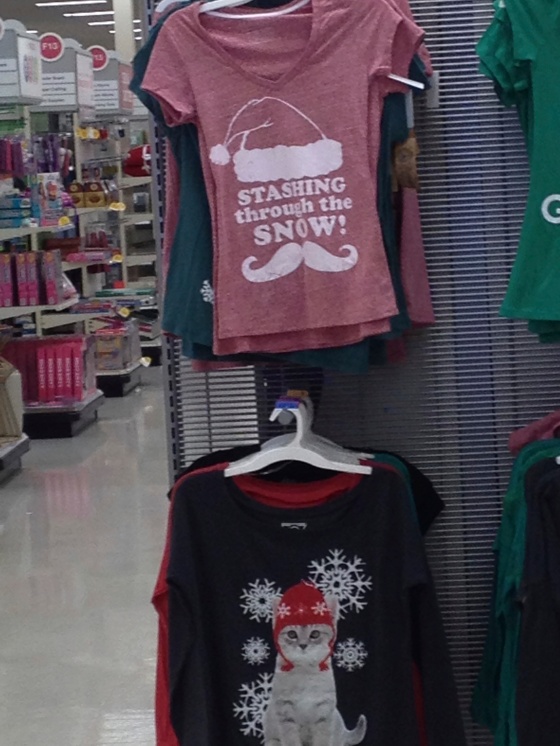
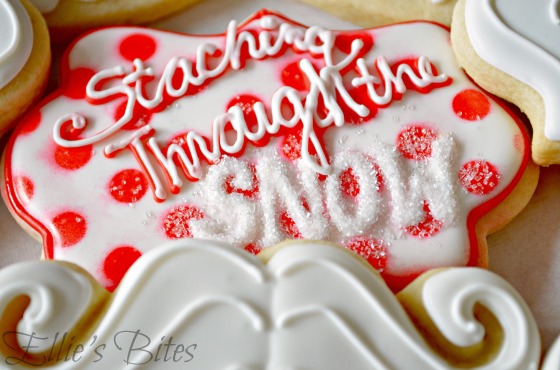
Staching Through The Snow (Santa Face From Fancy Square)

I saw this tee shirt in Target all the way back in November and I could not wait for an excuse to cookie it!

IMG_6562

I wanted to come up with a Santa face cookie to go along with it, but I wanted a cookie that focused on his facial hair. I thought, and thought, and turned all sorts of cutters in every direction until I saw it. Then, of course, I couldn’t unsee it.

The Fancy Square.

Santa Face From Fancy Square (Ellie's Bites)

This cookie has single handedly replaced any cookie I may have thought was my favorite as my new favorite.

To make it, you’ll need:

  • Red icing in a very thin, spreadable consistency
  • Flesh colored icing in a one step (20 second) consistency
  • White icing in piping and flood consistencies
  • Red airbrush color (or Wilton’s Color Mist in red)

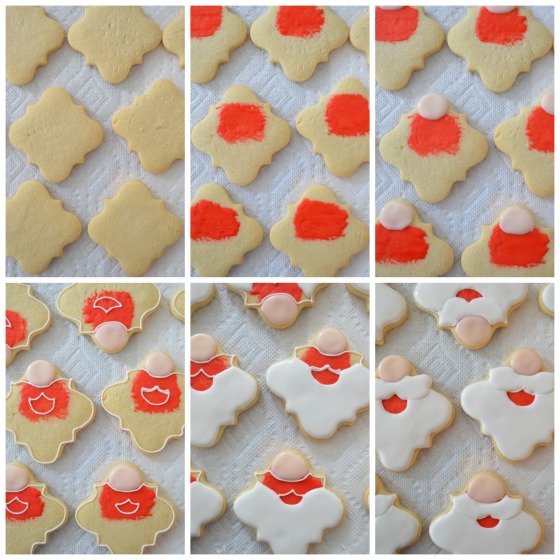
Santa From Fancy Square- Collage (Ellie's Bites)

  • Cut your dough with the fancy square and turn it on its side so it looks like a quatrefoil square. Bake your cookies and let them cool.
  • Using the very thin red icing and a spatula, paint a portion of the cookie (toward the top third of the cookie) with a light layer of red.Wait for this to dry completely.
  • Using the flesh colored icing, pipe and immediately fill an oval shape. Use a toothpick to pop any air bubbles to prevent cratering.
  • Using white piping icing and a PME 1.5, Ateco 1, or Wilton 2 tip, outline the rest of the cookie, and outline a mouth shape (dipping down in the middle of the top line to outline the bottom of the mustache).
  • Begin flooding with white flood icing. Flood the bottom section first and allow it to dry to create dimension between the beard and the mustache.
  • Flood the mustache and allow the whole cookie to dry completely.

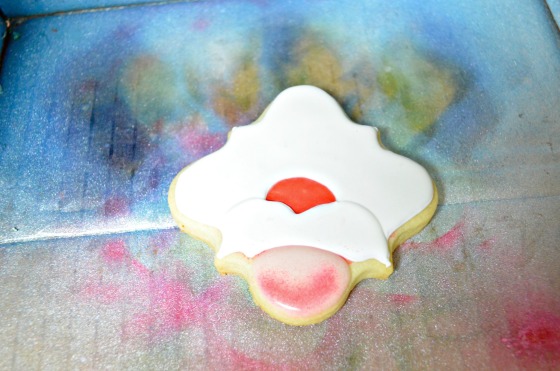
Santa From Fancy Square- Airbrush (Ellie's Bites)

Fill an airbrush with red airbrush color (or use Wilton’s Color Mist in Red). Lightly spray a red highlight along the top of the “nose”.

Staching Through The Snow with Santa face (Ellie's Bites)

Use the white piping icing again to add details to the beard and mustache.

Staching Through The Snow (Ellie's Bites)

When I showed this cookie to my friend Melissa at Simply Sweets by Honeybee, I was able to talk her into making a Santa Stache cookie too! So now head over to her blog to see what she came up with. I always love her cookies and this one does not disappoint!

Have you made a Santa Stache? Go ahead and show it off! Post it to my Facebook page. I can’t wait to see!

Sleepy Elf From Ornament Cutter

Originally, I thought I saw some elf potential in the cookies I made from the Wilton ornament cutters from Walmart. I thought the pointy, striped,  sparkly pompom’d hat looked like something an elf might be happy to wear.

It wasn’t until I was playing around in Picmonkey with the picture that I started thinking maybe those little striped hats looked more like night caps. And my elves looked more like happy, sleeping children- dreaming of the presents they might find the next morning.

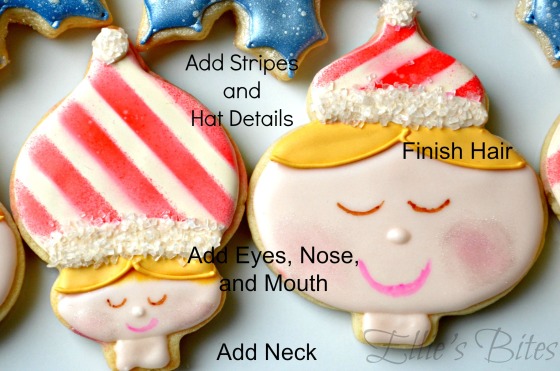
The Children Were Nestled All Snug In Their Beds (Ellie's Bites)Either way, once I saw cute little faces in cute little caps, I couldn’t un-see it. So I made a cute little tutorial for you. (By little, I mean I had a frustrating mishap with my new air brush and forgot to take several pictures. By cute, I mean that’s what you will think of my tutorial and ignore the missing pictures.)

You’ll need: A light colored icing (I used Wilton ivory mixed with Wilton white) in both piping and flooding consistency, A hair colored icing (I used a mixture of Americolor gold and Americolor egg yellow) in piping and flooding consistency, flesh colored icing (I used a toothpick dipped in Americolor Copper/fleshtone) in one step/20 second consistency, food color markers, pink luster dust, white sanding sugar, red airbrush color (optional- use a red food color marker if you don’t have an airbrush).

Elf from ornament collage (Ellie's Bites)

  1. Cut out your cookies using ornament cutters. Bake the cookies and turn them upside down.
  2. Outline your hats and fill the top part. Outline and immediately fill in a face. Wait 10-20 minutes for the icing to set.
  3. Add hair in two sections, waiting 10-20 minutes between sections. Add a neck (not pictured). Let this dry completely.           Sleepy Elf From Ornaments (Ellie's Bites)
  4. Add hat details with an airbrush, paint brush, food color marker, or icing.  Add a brim and pompom to the hat, sprinkle on some sparkle if you so desire. Add a nose with the fleshtone colored icing and add a mouth and eyes with a food color marker. Add cheeks with some pink luster dust. Pipe some details onto the hair.
  5. Allow the cookie to dry completely before packaging or eating.

PS- thank you to my online cookie friend (SugarNosh Treats) who was able to hear, diagnose,  and  cure my airbrush issue in about five seconds!


Hanukkah Oreos

I know that Thanksgivikkah was a once in a lifetime (several lifetimes, actually) phenomenon, but it’s been really weird this year. I started shopping for my kid’s eight gifts in early October. I was more concerned with wrapping Hanukkah gifts than making Thanksgiving treats. Neither holiday got the attention it deserved.

I made two sets of Thanksgiving cookies:

Thanksgiving Turkeys 2013 (Ellie's Bites)and this one for my dad:

Alice's Restaurant Cookies (Ellie's Bites)

I made one set of Thanksgivikkah cookies to bring to our Thanksgiving dinner/ Hanukkah celebration:

Thanksgivikkah Cookies (Ellie's Bites)But I didn’t make anything specifically for Hanukkah.

I remedied that situation this morning.

I raided the kids’ Halloween candy and found a pack of Oreos and some MnMs. In the pantry, I found some chocolate chips, white sixlets,  and some Hanukkah cookies left over from the platter above that I never decorated . When the kids weren’t looking, I took their gelt.

Hanukkah Oreos (Ellie's Bites)


First, unwrap the gelt. Do this in a different room than the one your kids are in, because they’ll hear the crinkle of the foil, and they’ll smell the chocolate. Then it’s all over.

Dip the Oreos in melted chocolate and place a chocolate coin on top. Easy. Let the chocolate set up. If you need to, put them in the fridge or freezer to speed up the setting up process.

Hannukah Oreos (Ellie's Bites)If you have some cutout cookies available, dip the tops in the chocolate too. (Or use graham crackers or any plain cookie.)

Sprinkle with crushed blue MnMs and crushed sixlets. Place a piece of gelt on top and drizzle with more melted chocolate. Allow this to set in the same way as the Oreos.

Hanukkah Cookie Bark (Ellie's Bites)Enjoy!


Inspiration Challenge {Lazy Sunday Mornings}

What do “Calvin and Hobbes” and “Peace and Quiet” have in common? On the surface,  absolutely nothing, right?! But, if you think about it for a second, you’ll realize that they are two things that I haven’t seen on a Sunday morning in way too long. (And two things that I miss dearly!)

When Melissa and I were brainstorming topics for this year’s challenges, I came up with this one. This year, Ben started Sunday school. Since he’s with the three year olds, he only goes twice a month, but if you remember, my husband has worked every Sunday for the last almost three years. This would be the first time in ages that I would have a WHOLE TWO HOURS to myself on a Sunday morning.

I had grand plans for those two hours. That is until I realized that every other parent whose children are in Sunday school, also goes to Starbucks to sit and read for two hours and there was not an empty seat to be found. So I spent that first morning walking so slowly and meticulously around Target that I’m sure security had a camera fixed on me.

Anyway. Lazy Sunday mornings. I’m not too sure I remember how to do them right.

Coffee Cookies (Ellie's Bites)

I am pretty sure that heaven is probably waking up to the sounds of Sunday Morning With Charles Kuralt, dragging my teenage butt down the stairs to bagels and lox, a hot cup of coffee, the Sunday comics, and not a care in the world. And what I wouldn’t do to be able to enjoy a cup of coffee on a Sunday morning now. To drink it while it’s still hot. To drink it before it gets knocked over by a preschooler and his Harry Potter Halloween costume Quidditch broom.

And that’s why I made these cookies. Coffee Roll Out Cookies (Ellie's Bites)If you’re not a coffee lover, then these cookies aren’t for you. If you’re a coffee liker- you’re good. My inlaws are tea drinkers and I’m pretty sure they were responsible for the damage done to this platter of cookies. If you’re coffee obsessed, then I’m warning you not to taste the row-dow (what Ben calls raw dough, and what we all now call raw dough). You won’t make it to the point of rolling them out. The dough itself tastes like the best coffee ice cream you have ever tasted.

If you’re lucky enough to make it to the point of baking the cookies, you won’t regret it.

Cookie Ingredients:

  • 1 stick (1/2 cup) of unsalted butter
  • 3/4 cup sugar
  • 1 egg
  • 1 tsp vanilla
  • 1/2 tsp coffee extract
  • 2 tsp espresso powder
  • 2 cups all purpose flour (plus more for rolling)
  • 1/2 tsp salt
  1. In the bowl of a standing mixer with the paddle attachment, cream butter and sugar.
  2. Add egg and extracts and mix well.
  3. Sift flour, espresso powder, and salt into the butter mixture and beat until smooth and the dough comes together.
  4. Preheat oven to 375F and line 2-3 baking sheets with parchment.
  5. Turn the dough onto a generously floured surface and knead gently into a smooth ball. Roll out to 1/4 inch. Cut out shapes and place on lined baking sheet.
  6. Bake for 9-12 minutes (check after nine, if the cookie still looks wet in the middle bake a little longer. I have a double oven and my baking time varies greatly depending on if I use the top or bottom section, and what kind of baking sheet I use.)
  7. Remove from oven, let cool for five minutes on the baking sheet then remove to a rack to cool completely.

*note- I got my coffee extract at Sur La Table and I saw it shortly after, and much cheaper, at Homegoods. If you can’t find it, use three tsp espresso powder and increase vanilla by 1/2 tsp.

*You should get 18 cookies or so depending on the size of your cookie cutter.

Icing Ingredients

  • 4 cups powdered sugar, sifted
  • 1 tbsp meringue powder
  • 6 tbsp water
  • 1/2 tsp coffee ext
  • 1 tsp vanilla
  • 1 tsp light corn syrup
  • Chocolate Brown food coloring gel (I used Americolor)

Here’s where you can have a little fun, too. I added 1 tsp of espresso powder and an extra 2 tsp of coffee extract. I like my coffee to taste like coffee. But there are so many flavorings out there! If you like a good pumpkin spice latte, add a half tsp of pumpkin spice emulsion to your icing. If you like Irish coffee, add a tsp of whisky (boil it for at least two minutes to reduce the alcohol content first if you want). My point is, the possibilities are endless. Coffee goes with everything.

  1. Place all ingredients into a stand mixer fitted with a paddle attachment.
  2. Beat until smooth, scraping the sides of the bowl when necessary, for about two minutes.

If your icing is a little thick, add some more water 1/2 tablespoon at a time. You want it to be a one step consistency (also known as 20 second icing) thick enough to outline, but thin enough to flood with. Drag a knife through the icing and count the seconds until the icing smooths over again. It should take a count of 10-20.

Coffee Cookie Collage (Ellie's Bites)

  1. Outline one half of the cookie with the icing.
  2. Immediately fill in the outline. Wait 10 minutes or so for the icing to crust over a little bit.
  3. Outline the other half of the cookie and…
  4. Immediately fill in the outline. Allow cookies to dry for several hours if you plan to package them.

Now, I can’t wait to see what Melissa has made for us! Go check it out at Simply Sweets by Honeybee and while you’re there, you can link up your {cookie, cake, recipe, craft} Lazy Sunday Morning themed project.

Now I’m brainstorming next month’s project- “Naughty or Nice”. It just sounds fun!

Custom Candy Spooky Eyes

Oh my. I have started to write this post four times and erased it each time. I seem to be suffering from some writer’s block today! Well, without any long story then, I’ll just jump into what I made, ok?

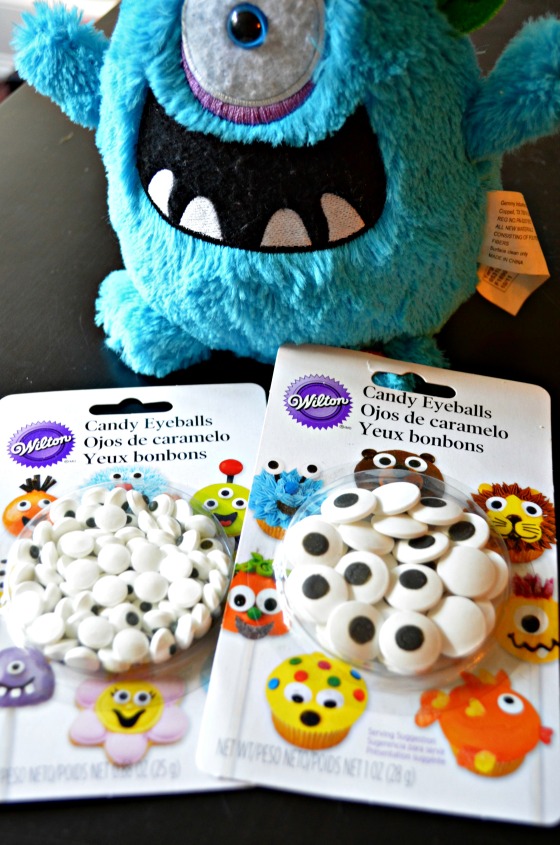
I love using Wilton’s pre-made candy eyes on my cookies. I know how easy it is to make your own from royal icing, but sometimes I still get a little bleeding and I don’t always know the reason. Sometimes I’ll even get bleeding on only one eye out of three dozen. I’m not sure and since it doesn’t happen consistently enough to diagnose and fix the problem, I usually wind up just using the candy eyes and not taking a chance. Because who wants bleeding eyes?

Monster Eyes


I was excited to find larger eyes the last time I went to the craft store and I had a little fun dressing them up.

Monster Eyes 2


I used my Americolor Gourmet writers to make some fun colored eyes.

Monster Eyes 4


I also found that you can mix your undiluted food coloring to get an endless number of custom colors. Just use a small paintbrush (one that you save only for use on food) and paint away. Oh, and ignore what I said above about “bleeding eyes”…..

Monster Eyes 3


Or bloodshot eyes.

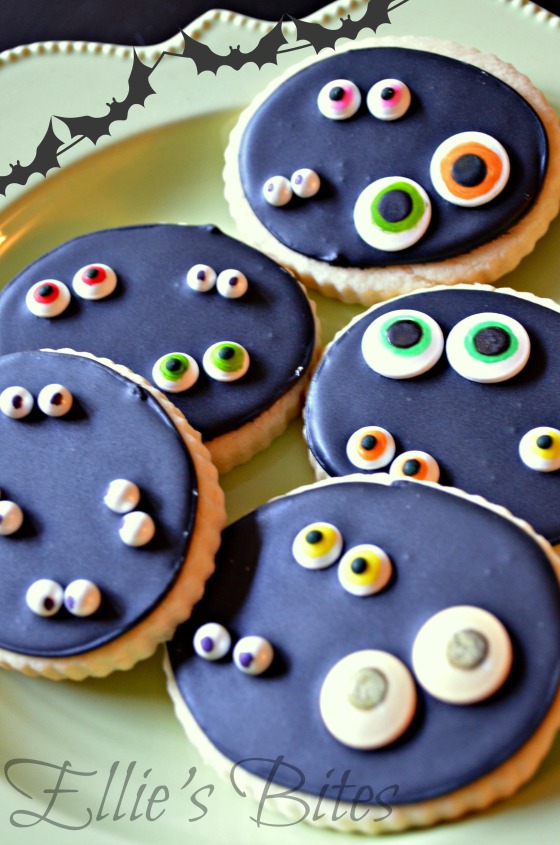
Once I had an assortment of fun and spooky eyes, I simply iced some basic oval cookies with black royal icing and dropped the candy eyes onto the icing before it dried.

Colorful Eyes Cookies (Ellie's Bites)


For even smaller eyes, I used large sugar beads and drew on the pupil with a black food color marker.

Colorful Eye Cookies (Ellie's Bites)


The above is a dramatization of my eyes during and then after a long night of cookie decorating.

Colorful Eyes Cookies Under The Bed (Ellie's Bites)


And the above is an example of a way to use cookies to freak out your seven year old, or at least her American Girl (I DO want my kids to sleep at night!). Poor Rebecca.

And if we even needed more proof that great minds think alike, go check out what my friend, Melissa at Simply Sweets by Honeybee, was making at the same time I was making these cookies…. I promise we didn’t even PLAN this. But she has a really delicious spin on making your own spooky eyes and a fun way to use them. And- the spooky eye cookies under the bed picture was her idea.

Scarecrow Cookies

I had the opportunity to make some really fun cookies. Someone I know, who throws the most creative birthday parties for her girls, asked me to make scarecrow cookies for her daughter’s fall themed birthday party. I was really excited, and as the time grew nearer, I started making some sketches. But nothing looked right. My scarecrows looked, well….. a little too scary. Good in the middle of a corn field. Not good on forty cookies staring at you from across the room.

I turned to clipart to get some inspiration and found some cute images, one that actually came close to what I had in mind. But there were a few things I wanted to do a little differently. Like the coloring. But I couldn’t figure out what colors I wanted to use. Then I remembered these cookies from SugarBelle:

 Finished Scarecrows

http://www.sweetsugarbelle.com/2011/11/cute-little-scarecrow-cookies/

So I combined a little of these cookies, a little of the clipart, and a little of my own adjustments, to come up with my own version.

Scarecrow Cookies (Ellie's Bites)

This is how I did it:

Scarecrow Cookies 1

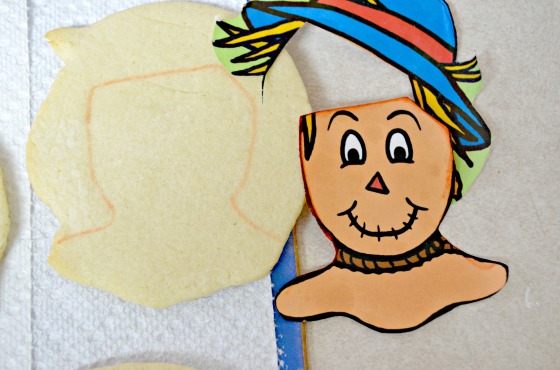
First I printed and cut out the clipart I liked. I used it as a template to hand cut the cookies and, after they baked and cooled, I traced the shape onto the cookie with an edible ink marker to get a general idea of the shape I wanted.

Scarecrow Cookies 2

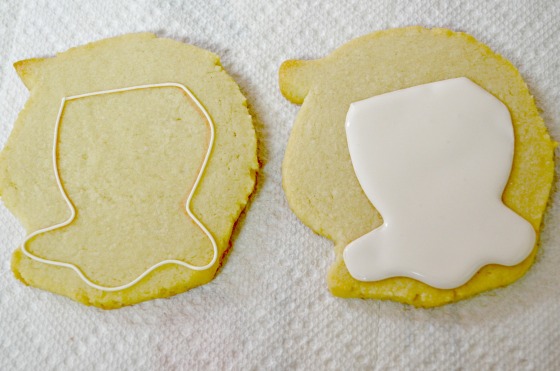
Second, using ivory piping and flood icing, I outlined and flooded the face. Then I allowed this to dry for several hours.

Scarecrow Cookies 3

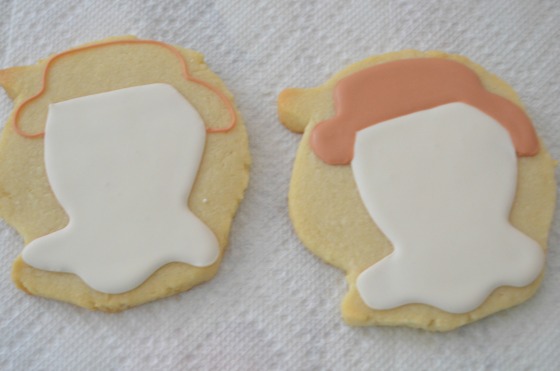
Next, I outlined and flooded the hat, using a warm brown (I made a mix of ivory and chocolate brown with a dab of orange).

At this point I got worried, because instead of a scarecrow, I saw this:

Scarecrow Cookies 4

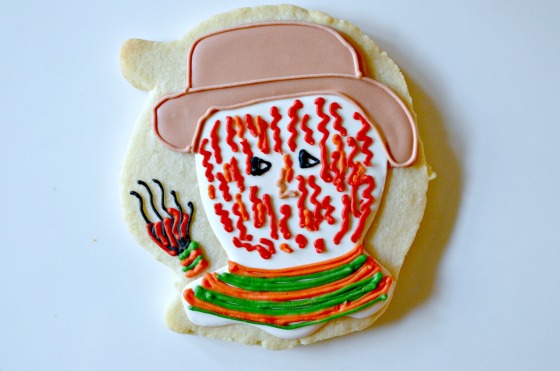
But I pressed on, and once I added the details to the dry faces, the scare crows shaped up.

Scarecrow Cookies 5

Using piping icing in a mixture of gold and egg yellow, I piped straw poking out around the neck and under the hat (another thing influenced by SugarBelle’s scare crows). Then I used black piping icing to make eyes and a smile, red to make a nose and a hat brim, orange to make a rope tie around the neck, and orange, green, and brown for hat details. Then I gave him a little color on his pale cheeks with some pink luster dust and a pain brush.

And that is how I combined different images to come up with another idea.

If you’re not into hand cutting your cookies (and I think I may be the only one in the world who prefers it!) follow the link under SugarBelle’s picture to find her original post and learn how to make those adorable scarecrows.