Inspiration Challenge {Naughty & Nice}

It’s that time of year again!

What time? Well, time for another Inspiration Challenge hosted by Melissa at Simply Sweets by Honeybee and myself. But it’s also time to start mentally weighing your actions and wondering which way the Naughty vs Nice scale is going to tip.

Naughty or Nice Naughty (Ellie's Bites)Are you going to come up Naughty?

Naughty or Nice Nice (Ellie's Bites)

Or nice?

Naughty or Nice What's in your stocking (Ellie's Bites)

I guess the only thing to do is be on your best behavior for the next twenty four days and see what happens.

Naught or Nice Cookies (Ellie's Bites)

To make the stockings:

Naught or Nice 3D Stocking How To (Ellie's Bites)

  • Cut two stocking shapes out of your favorite roll out cookie dough. Also cut out a small rectangle. Use the long part of a candy cane cutter to cut a notch most of the way through the rectangle. Bake and cool.
  • Decorate one stocking. Using royal icing, attach the rectangle to the undecorated stocking (or the undecorated side of one if you decide to decorate both, which I just now realized is an option…..)
  • Attach the other stocking to the top of the rectangle using royal icing. Let dry completely.

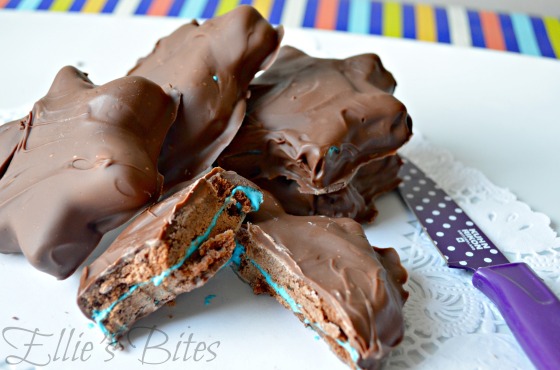
To make the coal cookies:

Naughty or Nice How To Make Coal Cookies (Ellie's Bites)

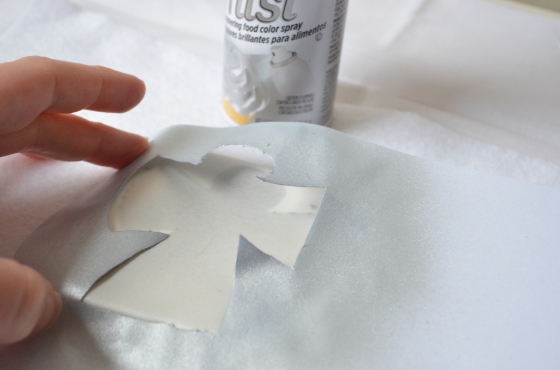
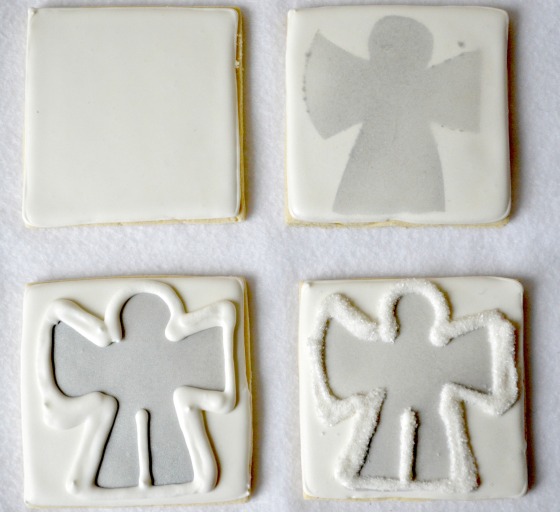
  • Use any basic shape cookie. Paint a thin layer of black icing onto the cookie with a spatula. Don’t stress out over any air bubbles or lumps. Let the base coat dry.
  • Use a stiffer (20 second count) black icing and pipe on some lumps and bumps. Try not to let the bumps and lumps touch.
  • Sprinkle a little disco dust over the lumps and bumps and let them dry until the surface has crusted over.
  • Pipe on some more lumps and bumps. Let dry completely.

To fit the coal into the stocking, either roll the cookies out a little thinner than you rolled out the rectangle cookies, or do what I did and use a microplane zester to gently shave down the coal cookie on the back, undecorated side until it fits. (Don’t try to force it or you could risk breaking the stocking cookies.)

Naughty or Nice- Filling the stocking (Ellie's Bites)

If you roll your cookies to 3/8 inch, a standard candy cane will fit perfectly!

Now go see Melissa’s interpretation of Naughty and Nice. I love it! While you are there, link up your Naughty and Nice creations (anything goes- cookie, cake, candy, recipe, craft, etc….)

I’m really looking forward to January’s challenge! Just as the temperature drops get ready to warm up your oven to make something “Warm and Fuzzy”!!

Simple Kentucky Derby Themed Cookies

I made these cookies last week, and although they were quite frustrating at times, they were actually very simple to make. Kentucky Derby Theme Wedding Shower Cookies (Ellie's Bites) First, a few days ahead of time, you’ll need to make your royal icing transfers. Draw the image that you would like to use, or find one online and print out several on one sheet of paper in the size you’ll need. I used an image I found online and altered the shape of the ears and hair tufts to make them a bit sturdier. My images are about two inches square to fit onto a three inch cookie. Place the paper under a sheet of wax paper and outline the image with dark grey piping icing, then flood with icing of the same color. Make way more than you’ll need. Once you think you’ve made enough, make more. Then a few more. Then one more just to be safe. Let your transfers dry for as long as you can, at least 24-36 hours. Once dry, spray your transfers with a light layer of silver color mist. Then gently remove them. What worked for me was to slide a very sharp knife blade all the way under the transfer until it lifted entirely. Since they are a bit big, they had the tendency to break when I tried peeling the paper from the transfer. If they are not completely dry on the underside, flip them over and let them dry for a while longer. At some point, while the transfers are drying, bake your cookies- these are three inch scalloped rounds- and base coat with white icing. Let this dry completely. When both cookies, and transfers are 100% dry, use a chevron stencil and silver color mist to create a background.  (I got my stencil at Michael’s, but there are a bunch of stencil shops online now including: The Cookie Countess and Salsa Stencils. ) Kentucky Derby Themed Wedding Shower Collage 1 (Ellie's Bites) Kentucky Derby Theme Wedding Shower Cookies Collage 2 (Ellie's Bites)

  1. Make your transfers.
  2. Use a template to add a background design to your dry white cookie.
  3. Use a small amount of white icing to gently attach your transfer.
  4. Using red flood icing, make several small circles. Try not to let them touch. Let these circles dry for about 10 minutes.
  5. Use red piping icing to make swirls.
  6. Fill in the spaces between roses with more red circles and allow these to dry for about 10 minutes.
  7. Finish the wreath with red piping icing swirls on the rest of the dots.
  8. Easy and pretty!

The reason these were frustrating was the number of transfers that broke.  As long as you make plenty of extras this is a pretty stress free project. The main thing I learned with this project was when the transfers didn’t pop off like they usually do when peeling the paper back, I needed to stop, reevaluate and come up with a Plan B. It was humid here last week, and the transfers weren’t drying all the way through. As soon as I figured out that the best way to remove them was with the knife, I didn’t get any more breakage. Then I was able to flip them over and allow them to dry all the way through. So maybe you can learn from my mistake (a lot sooner than I figured it out!) This tutorial can be applied to just about any theme, too. I didn’t get a chance to take a nice picture, but I made these dragon cookies the exact same way. IMG_5721   Wow were those dragon tails frustrating! This post is linked up at Party In Your PJs at The Cookie Puzzle and Simply Sweets by Honeybee.


Good Luck Charm

When Melissa of Simply Sweets by Honeybee asked me to be a part of her St. Patrick’s day collaboration, I immediately said “YES!”… because she’s my friend. However, when I thought about it, I almost wrote back and backed out. The project (as you probably read in the title of this post) was to cookify our lucky charm.

I’m not saying I don’t have anything that I consider lucky. I have a particular spatula that I know if I don’t use it to scrape the side of my mixing bowl, my royal icing will fail. I have a cup that I have to use when I eat at my parents house- I know it’s my cup by the way it was warped in the dishwasher. I have a favorite coffee mug.

But honestly, would any of these things be particularly fun to cookify?

Then it hit me.

Lucky Charms (Ellie's Bites)

When Ellie was born, my dad bought her a little pink security blanket. The first time we put it in her carseat, she immediately snuggled up with it.  She was only a few days old, but she wrapped her arm around it and held it close. When she stopped sleeping sometime around four months old, we would put her in her swing in our room, give her the blankie to snuggle into and she would go right to sleep. At the time, we assumed she wanted to be in our room, close to us. Or that she had a little reflux and was able to sleep better slightly upright. At around six months old, we asked her pediatrician when she could have her blankie in her crib. He said, “not until she can recognize it and acknowledge it’s presence.” We held the blankie in front of her, she immediately grabbed it to her chest and snuggled it to her face. The doctor said, “go ahead and give it to her tonight.” That night she slept through the night for the first time in two months!

100_0358

So as soon as Ben was born, (three years ago tomorrow!) we bought one for him too. He actually never took to the one we bought him. Then one day when he was about a year, we were walking around Pottery Barn Kids. He grabbed something off a shelf as I pushed him past in his stroller. And since that day, he refuses to sleep with any other blankie!

Lucky Charm (Ellie's Bites)

Confession- sometimes when I can’t sleep, I borrow one of their “spares” (and believe me, we have many spares) and something about it helps me drift right off. And since sleep is one of my most favorite things in the world, something that helps all of my family members sleep? THAT would have to be my lucky charm.

Now, there are so many other amazing interpretations of “Good Luck Charm” in this collaborative project that you need to go check out. I can’t wait to read everyone’s posts to see what makes these things lucky for them!

Good-Luck-Charm-Collage-Numbered
1)      Opal Ring by Tami Rena’s Cookies
2)      My Children by Kookie Kreations by Kim
3)      Hamsa & Evil Eye by Not Your Everyday Cookie
4)      Wonder Woman Shirt by The Cookie Puzzle
5)      Attitude is My Good Luck Charm by Pink Little Cake
6)      Cookies Are My Lucky Charm by The Baked Equation
7)      Good Luck Money Tree by Semi Sweet Designs
8)      Security Blanket by Ellie’s Bites Decorated Cookies
9)      Lucky Number 32 by Cristin’s Cookies
10)   Always With Me by The Cookie Corner AZ
11)   Leprechauns by Trilogy Edibles
12)   Good Luck Elephants by Simply Sweets by Honeybee

Inspiration Challenge: January {New Year/ New You}

Good morning everyone! I hope you spent your New Years Eve doing exactly what you wanted to be doing! As for us, I know no matter how late I go to bed, my kids will still be up around 7am. So I’ll save the partying til 2AM thing until Ben is either potty trained or I can teach Ellie to change his diaper and pour them both a bowl of cereal. And let me sleep in!

January’s challenge wasn’t really about finding inspiration in something around you. It was more about finding the inspiration in yourself. Trying something new. Not caring if it actually worked or not, just crossing something off of your list.

With the week off, and no obligations, I found myself trying a few new things, other than the one I had planned for this post. Of course, I didn’t bother photographing them, so I don’t have any evidence. But I can tell you- the apple cider caramels (from The Smitten Kitchen) were a big success. The pink macarons- big opposite of success. Then again I wasn’t expecting much when I got the recipe I used by Googling “easy french macaron recipe”. Chances are if it’s “easy”, it’s not going to turn into a french macaron. They tasted good though, and in the end, that’s what matters.

For my challenge cookie, I decided to try a stained glass cookie. It’s something I have seen many times, but had never thought to make. I bought a bag of Jolly Ranchers (I think it was Wild Berry Fruit Flavors) and sorted the candies by color. Then I pulverized the candy in a food processor. I rolled out the cookies, cutting out a shape in the middle and sprinkled some of the pulverized candy into the hole in the cookie. Then I baked and decorated as usual.

New Years 2013 (Ellie's Bites)

Using the blue candy, I kept thinking how much it looked like the surface of a pool, and another idea evolved.

Koi Pond Collage (Ellie's Bites)

I baked an oval and base coated it in white icing. When that dried, I painted a bunch of blue and green swirls and some vaguely fishy shapes in yellow, orange, and a bit of gold disco dust. I also baked two oval rings and filled one with the melted candy. The other I iced in a white stone patter, then painted with shades of grey and piped on green vines. The flowers are flower shaped sprinkles with orange centers painted on. When all three components were dry, I stacked them.

Koi Pond (Ellie's Bites)

So now go check out Melissa’s post over at Simply Sweets by Honeybee and see how much fun she had trying a new technique. And don’t forget to link up your own experience there. Then next month, in honor of Valentines Day, we’ll be finding inspiration in romance and famous couples. Who will you choose for your inspiration?

Easy Elegant Christmas Cookies

I made three sets of Christmas cookies this year (well, two are done and one will be finished this weekend), and this is my favorite, hands down. Probably my favorite all time Christmas set.

Christmas Platter- Monochromatic Cookies (Ellie's Bites)

I think I like them best because they are so simple, and still make an impressive impact. The best part is those large cookies. They can be made using one color, three colors, or a thousand colors (if you’re really ambitious and you don’t hate mixing colors like I do!).

Monochromatic Christmas Cookies (Ellie's Bites)

You need a cookie and your icing, in piping and flood consistency. Outline and flood your cookie, let dry for several hours. Then pipe on whatever words strike your fancy. So simple and with one color, you don’t even have to worry about bleeding!

What are your favorite cookies so far? (Feel free to link them up in the comments.)

Easy Christmas Trees

A few months ago, I accidentally made a batch of cookies and only added enough sugar for a half of a batch. Fortunately, they happened to be squares, not some obscure shape, so I was able to freeze them just in case inspiration should strike. You can always find a use for plain squares. Then I saw some cute Christmas tree tee shirts made with ribbons, and I was inspired to pull out one of those squares.

Ribbon Trees (Ellie's Bites)

You’ll need

  • squares or circles outlined, base coated, and dried
  • Stiff green icing and a petal tip (size depending on the size of your cookie- this was a 101)
  • Red and green confetti sprinkles
  • Yellow star sprinkle
  • Stiff brown icing with a star tip

Ribbon Tree Collage (Ellie's Bites)

1- Pipe a ruffle along the bottom of the cookie, leaving room for the tree trunk. Add some confetti sprinkles using tweezers.

2- Pipe more rows of ruffles with sprinkles, making each row a bit shorter to create a triangle. Attach the star sprinkle to the top  with a dab of icing.

3- Add a trunk with your star tip.

That’s it! Wouldn’t these be cute packed in a cellophane bag with some small red, green, and white circles?


Marshmallow Filled Chocolate Covered Chanukah Cookies

I’m pretty sure that the title of this post says it all, so I’ll just get on with the picture.

Marshmallow Creme Filled Chanukah Cookies (Ellie's Bites)

I said in a previous post that most of these ideas can be translated into any holiday theme or, like these, just made for anytime. For instance, I just used two chocolate cookies, cut into Chanukah shapes (see Lila Loa’s page for the go-to chocolate cookie recipe I love).I  tinted a little marshmallow fluff with some blue food coloring and I added about 1/4c powdered sugar to one cup of fluff to theoretically make it easier to mix in the food coloring. I’m not sure it made a difference. Then I took a bit of the blue fluff and spread it between two cookies. I chilled them in the freezer for about 20 minutes to keep the fluff from oozing out the sides, then I coated them in melted milk chocolate. Then I left them overnight in the fridge to set the chocolate(overnight because I made them around 11pm) and when I woke up, I had (a half of) one for breakfast and it was good.

Obviously, you could use any cookie recipe, any color fluff, and any percentage chocolate. But since we are having these for our last night of Chanukah dessert, I made Stars of David and Dreidels.

I hope you enjoyed these Chanukah cookie posts! Now it’s on to Christmas cookies 🙂

Chanukah Cookies

Yesterday, I sat down at the computer to write this post and I couldn’t do it. Ellie was still at school and all I could think about was having her home. Ben was in his room, not napping, and I just wanted to go upstairs and hold him until he fell asleep. So that’s what I did. I’m sorry, but I knew you would understand if my post about cookies was a day late. Thank you.

When I was trying to come up with a plan, I had a solid six ideas. I had another floating around in my mind, but for the eighth, I was drawing a complete blank. Ellie actually said to me, “What about the miracle of Chanukah?”. That’s when I had the idea to handcut cookies in the shapes of the letters on the dreidel- the letters which are an acronym for the hebrew phrase meaning “A Great Miracle Happened There”.

A Great Miracle Happened Here (Ellie's Bites)

At first, my idea was to make a platter of smaller cookies, but I knew I wouldn’t have time to make them for the party we had last weekend, so I decided to just make larger cookies, and one of each letter.

Don’t underestimate the freedom of handcutting. If you make hundreds of cookies of the same style, it would make sense to order a custom cookie cutter, or make one yourself. But for one or two accent cookies? Just go for it.

One more Chanukah cookie to go!

Inspiration Challenge: December {Winter Wonderland)

When you wake up in the morning, look out the window to see several inches of freshly fallen snow, and check your phone to find a text from your boss saying that the office will be closed that day, what is the first thing you think about doing? If it’s pulling the covers up over your head and going back to sleep, we have something in common. It’s the first thing I think about, too. Until the six year old (who knows the snooze button very well on school days) comes bounding through the door, launches herself across the room and rips the blanket from over my head, screaming, “it’s snowing, it’s snowing, it’s snowing, can we go outside, can we go outside, can we go outside……….etc, etc, etc!!!!!!” I glance over at the clock and notice that it’s only 7am (wait- her alarm doesn’t go off until 7:30 and she usually hits snooze until I make her get up at 7:50- what is she doing up at 7am? Snow instinct?) but I know there is no use trying to reason with her. I grab some sweats and dress her in as many layers as I can fit under the snowsuit and we are out to make snow angels before breakfast (*see note below picture).

Snow Angel (Winter Wonderland Inspiration Challenge) Ellie's Bites

(* The above scenario has not actually happened, only because we haven’t had a ton of snow in the last two years. They are predicting a lot more snow this year, and I am predicting the above scenario will occur.)

In actuality, I really like snow! I like the look of it. The view into the woods behind our townhouse is incredible- like a snow fairy’s forrest.  I love to watch it come down….from inside the house… through a window….cup of hot chocolate in hand.

So, stay warm this winter and make these cookie snow angels instead of snow snow angels.

You’ll need:

  • A cookie iced in white
  • Snow angel template
  • Wilton’s color mist in silver
  • White icing in a soft piping consistency
  • White sanding sugar

To make the snow angel template, draw your angel on a piece of stiff paper (ignore the fact that I used regular white paper it curled up after only a few cookies) making sure it is sized for your cookie. Cut out the figure, making sure the outline is intact. Lay your template across your cookie, hold it with one hand and spray the color mist lightly with the other hand. Life the paper away carefully so you don’t get too much bleeding, but a little is fine because it will be covered up.

DSC_0379

Practice on a paper towel first, it’s hard to find the right pressure you need to spray lightly.

DSC_0380

The cookie on the right was the first one, and I used way too much pressure. If I had practiced first, it wouldn’t have been wasted.

Snow Angel four steps (Ellie's Bites)

After spraying, wait a minute until the alcohol in the spray has evaporated and the image is dry. Outline with the white piping icing and immediately sprinkle generously with the sanding sugar. (The reason I suggest using a soft piping consistency is so that it doesn’t dry too fast , and the sugar sticks.) Ignore the fact that I made these at night, and took the pictures the next day, so my piped outline had dried completely.

That’s it! Now head over to Simply Sweets by Honeybee and see what beautifulness Melissa created for us this month and link up your Winter Wonderland cookies 🙂

Next month’s challenge isn’t as much about finding inspiration in the things around you. It’s more about finding inspiration in yourself. “New Year/ New You”. Challenge yourself to try something new. Painting on a cookie? Building a 3D cookie? Brush embroidery? And if you’ve never tried to make a fancy cookie before, but always wanted to, now is your chance! Stretch your imagination and I’ll bet you can do a lot more than you think you can!